
I started to appreciate the utility of dry bags on a canoe trip on the St. John’s River in Northern Maine during a cold week in May. Several friends on this trip decided to save a few dollars by keeping their gear wrapped inside garbage bags that was then stuffed into a backpack.
The garbage bag routine worked fine to keep out water that was splashed on the backpack. However, this routine quickly broke down when large volumes of water started to accumulate in the bottom of the canoe as we ran rapids. The water quickly found it’s why into all the little holes of the garbage bag. This completely soaked my friends clothing, which wasn’t a happy event due to the falling snow and chilly air.
Even worse, one of the canoes capsized while running a Class III rapids. Unlike dry bags, which are meant to float, their backpacks didn’t. As such, the St. John’s River of Northern Maine to this day holds a friends backpack that contained much of his clothes, his wallet and cookware, not to mention a few cases of beer the river swallowed up, too.
So what’s the moral of the story? if you plan to float a river, whether for an hour, a day or a week, use a dry bag to store your gear.
Period.
The purpose of this article is to introduce canoeists, paddlers and recreational river floaters to the dark and murky world of dry bags. Contents of this article include:
- The Different Types of Dry Bags
- Dry Bags v Dry Boxes
- What Type of Dry Bag to Get
- Shopping Considerations
- Where to Buy Dry Bags
The Different Types of Dry Bags
Standard Dry Bags
Standard dry bags come in all sizes and colors. But regardless of size, they all share the same shape. Dry bags open at the top, usually have a narrow opening and are rather deep.
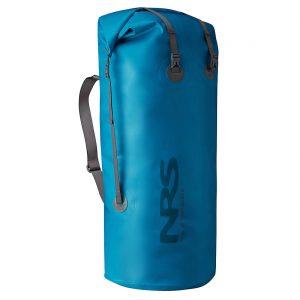
A standard dry bag design, tall but narrow. This bag has backpack straps for easy carrying and portaging. See more dry bags at NRS.
Dry bags—at least quality ones—are 100% waterproof if sealed properly. To seal a dry bag, simply roll the top three times then buckle each end together. By rolling the top, you seal out water. And by buckling each end together, the seal is kept tight and can’t unroll.
Another feature of dry bags is that they float. The process of sealing a dry bag traps air inside the bag. Should your boat capsize, the bag will remain floating—allowing for easy retrieval. Since the bag floats, it is rather important to attach the bag to the boat to prevent the bag from “floating away.”
The “tall but narrow” design of dry bags, while unhelpful for gear organization and retrieval, serves a purpose—to allow gear to be stuffed into nooks and crannies of smaller boats or easily tossed and stacked on top of other dry bags.
Moreover, by making the bag “tall but not wide,” it maximizes the interior storage space of the bag. Since dry bags can only be loaded to a max of ¾ capacity, by having the bag “tall” you lose less space when you roll the top and seal the bag shut.
Dry Sacks
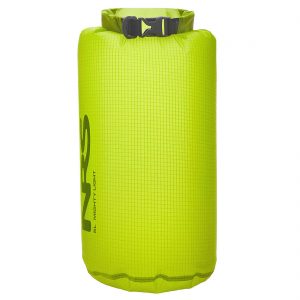
Dry sacks are useful for storing small items and for organizing items inside non-waterproof bags, such as backpacks. More info at NRS.
Dry sacks are quite similar to dry bags in appearance. It is fully waterproof and most dry sacks close the same way a dry bag does—by rolling it three times and then clipping it shut.
However, unlike a dry bag, a dry sack isn’t meant to “float” on the water like a dry bag does. Instead, dry sacks are, in the simplest terms, waterproof garbage bags.
Most people use them to store gear that can’t get wet and then put the sacks inside a non-waterproof pack—such as a backpack.
Others, like myself, attach the dry sack to the side of their boat (using rope and carabineers) and then use the sack to store small, personal items on float trips.
Waterproof Duffel Bags

A small NRS waterproof duffel bag. See more duffels at NRS.
Waterproof duffel bags are a wonderful invention. They make storing gear so, so much simpler—especially clothing items. Unlike a dry bag, which opens from the top and is deep but narrow, a duffel bag is long and wide while still opening from the top.
The design of waterproof duffel bags makes them much easier to organize. And since the top is “long not narrow” and opens up fully, it is simple to reach items stored anywhere inside the bag. You don’t have to remove everything from the bag to reach something that might be at the bottom.
Waterproof duffel bags, in contrast to dry bags, can be stuffed to almost full capacity. For this reason, a full duffel bag will not float—usually. Thus, floaters should always securely attach duffel bags to their boat.
Related Article : How to Choose a Waterproof Duffel Bag
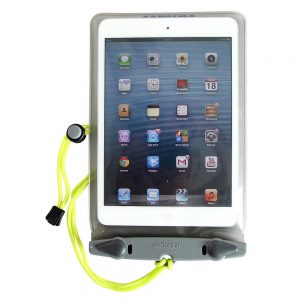
Phone & Tablet Waterproof Soft Cases
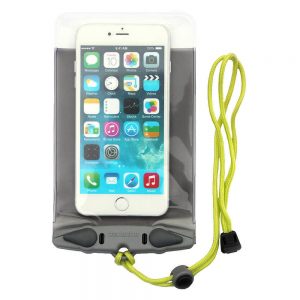
NRS Smartphone Waterproof Case. Perfect for float and fishing trips. More info at NRS.
These small waterproof cases are designed for one specific purpose—to keep your personal electronic items dry while still allowing for full or partial use of the items.
For example, the tablet case I bought for my iPad allows me to use most functions of the tablet—including touching, swiping and turning on/off. Phone cases work in a similar fashion, too.
These cases can either be attached to the boat, such as I do with my iPad. Or, using the lanyard, be attached to your life vest or wore around the neck.
If you plan to bring a phone or tablet on a float trip, be sure to buy one of these handy cases—particularly if you plan to use your phone or tablet while out on the water.
Related Article : Detailed Guide to Waterproof Phone & Tablet Cases
Dry Bags v Dry Boxes
So what’s the difference between a dry bag and dry box? Well, it’s quite simple, as the photo below shows.
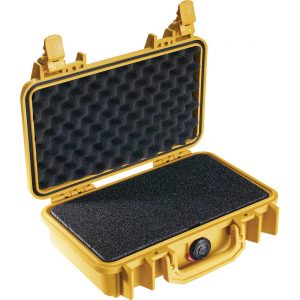
A Padded Dry Box. Ideal for storing larger electronics, such as laptops or DSLR’s. See more at NRS.
A dry box is, as the name suggests—a waterproof plastic box. Most dry boxes are used to store large electronic items that require extra padding—such as laptops, video cameras and large DSLR’s. There are, however, also some “micro” sized dry boxes. These micro boxes are generally used to store small electronic items, particularly smartphones. Being a box, a dry box is naturally hard-sided. You can sit on it and it won’t bend or break.
Dry boxes tend are often large and bulky. As such, they are most used by floaters who own larger boats, such as whitewater rafts and canoes. The larger space of these boats allows room to store the often bulky and awkward size dry box.
By contrast, all dry bags are soft sided. When empty, they lay flat and weigh little. For most floaters, dry bags are all that’s needed. This is especially true for floaters using smaller craft, such as inflatable kayaks, hard shell kayaks, pontoon boats and other smaller inflatables.
What Type of Dry Bag to Get & How to Use?
The Standard Dry Bag
The “ugly” monster of float trips, a standard dry bag is the most common bag used. And there’s a reason for this—they are the only bags usually large enough to hold items such as tents, sleeping bags and other bulky gear.
Since standard dry bags do not have pockets or other organizational utilities, it can be helpful to get one that is clear—making it easier to find what you need.
One suggestion—get a dry bag large enough for “camp gear,” such as tent, sleeping bag, sleeping pad and cooking stoves. And then use that dry bag only for camping gear.
Keep your clothes and other personal items in a separate dry bag or, better yet, a waterproof duffel bag. This method makes organization much simpler and avoids the problem of getting your clothes dirty when you stuff a dirty, wet tent inside the bag.
Organization Tip
Here’s a quick tip on how to keep your gear organized on multi-day overnight float trips. Use two dry bags and one waterproof duffel bag, and use them to store the following gear:
- Camp Gear (tents, sleeping bags, camp stoves, etc..) goes inside the largest dry bag
- Food goes inside a smaller dry bag, ideally which is clear in color
- Clothing and other personal items go inside a waterproof duffel bag, ideally clear in color as well
By having three bags—one for clothing and personal items, one for food and a final for “camp gear,” it’s easy to stay organized and avoid having to go “dry bag diving” in search of gear.
Waterproof Duffel Bag
Waterproof Duffels are the stylish and functional way to keep your gear dry. Unlike dry bags, waterproof duffels make it significantly easier to organize and access your gear. But that comes at a price of generally smaller capacity and, often, the lack of flotation.
Best use for a waterproof duffel bag is to store your clothes and other items that are not part of your “camp gear” setup. In short, use it to store items you’ll retrieve frequently and which you don’t want to get dirty.
Phone or Tablet Case
NRS Tablet Dry Base. Ideal for kindles and iPads. See more at NRS.
If you’ll use your phone or tablet when “out on the water,” you’ll want a phone or tablet waterproof case.
Remember, if you plan to use your phone or tablet for navigation (like I do with my iPad on remote floats), you’ll want a case that allows you to swipe/touch and do most functions that your phone/tablet can do normally.
And lastly, don’t destroy your tablet or phone by using a cheap case. The NRS tablet case I bought for my iPad has survived may a float trip and never once let in a drop of water. If you’re depending on your phone or tablet for navigation in remote areas, taking a chance with a cheap case is a very bad idea.
Shopping Considerations
Dry Bag Size
Dry Bags should only be loaded to 2/3 to 3/4 of its capacity. This keeps air inside the bag, which allows the bag to float should your boat capsize. Additionally, the extra space allows the bag to properly seal when you roll up the flap.
Thus, when you shop for dry bags keep in mind that the bag will be somewhat larger than a typical backpack or duffel bag that has equal capacity.
Since dry bags are often rather large, shoppers need to keep in mind where they’ll be fitting these bags inside their boat, too.
Capacity
Since the dry bag has air inside it once the bag is sealed, the capacity of the dry bag is reduced to 2/3 to 3/4 of its rated capacity. Thus, always get a dry bag that seems bigger than you need.
This is especially true if you’ll be packing long, skinny items such as tents. If your tent has a length of 22 inches (a common length), you’ll need a dry bag that has a length of at least 30+ inches. If the bag is any shorter, you won’t be able to properly close and seal the dry bag.
Clear or Colored?
I use clear dry bags/duffel bags for personal item organization and for my food dry bag. The clear “color” makes it simple to look inside my food bag and pull out what I want, without emptying the bag out. And my clear duffel bag makes it a snap to find smaller personal items or clothing that I might want. To store my camping gear, I use a large red NRS dry bag. For dry bags that will be used for tents and sleeping bag storage, there’s little reason to spend extra money on a clear bag.
But that’s just me. Obviously, colored dry bags provide privacy of the items stored. During the solo floats I usually take, privacy isn’t a concern. But on larger group floats among strangers, there are plenty of reasons to go with a colored dry bag—even if makes finding items more difficult.
Where to Put Your Wallet, Purse or Keys on Overnight Trips
Figuring out what to do with small personal items, such as car keys or wallets, is often tricky on overnight float trips. Under no circumstances should you just “dump” them individually into a large dry bag. Doing so is a recipe for lost items, since these items will either fall out when you empty the large dry bag or be inadvertently “pulled out” when you yank items out from the dry bag (such as your clothes or sleeping bag).
What I’ve found works well is to buy a small or extra-small dry sack. I put all my personal items inside this sack, remove all air from it, seal the sack and then put the sack at the very bottom of the dry bag.
Since the bag is at the very bottom of the bag, it won’t be pulled out or shift around during a multi-day float trip. And since they are all together inside a bag, you won’t lose individual items.
Where to Buy Dry Bags
Standard dry bags are commonly sold at most specialty sporting good stores, such as REI and Cabela’s retail outlets. Avoid the ultra-cheap dry bags occasionally sold at big box stores. I once made the mistake of buying a cheap dry bag from Wal-Mart, and the bag quickly fell apart at the seams. Other types of dry bags, however, are difficult to find in bricks and mortar stores.
Due to the large variety of dry bags made today, most people buy their dry bags online. Without question the first place anyone shopping for a dry bag should visit is NRS. They have one of the largest selections of dry bags you’ll find. More importantly, all their bags are top-quality, and won’t leak or fall apart after a few uses. Most of their bags are also made in the USA, too. Links to each type of dry bag is provided below.
- View all Standard Dry Bags & Dry Sacks at NRS
- View all Waterproof Duffel Bags at NRS
- View all Phone Cases at NRS
- View all Tablet Cases at NRS
- View all Dry Boxes at NRS
- Go to the NRS Home Page
Amazon, obviously, also has a huge selection of dry bags and various waterproof cases. Just be very careful when buying one. Many are rather, umm…poor quality items from Asia that have a tendency to leak and fall apart. Yet others are of good quality. It’s a bit hit or miss.
Other online retailers with a good selection of dry bags, dry sacks and other waterproof enclosures include: